One of the tools of poetry is formatting text in special ways: indenting a line differently or spacing out words in new ways. However, being playful with text in the WordPress content editor and within the confines of plain HTML can be challenging.
So poetry bloggers have had to get creative.
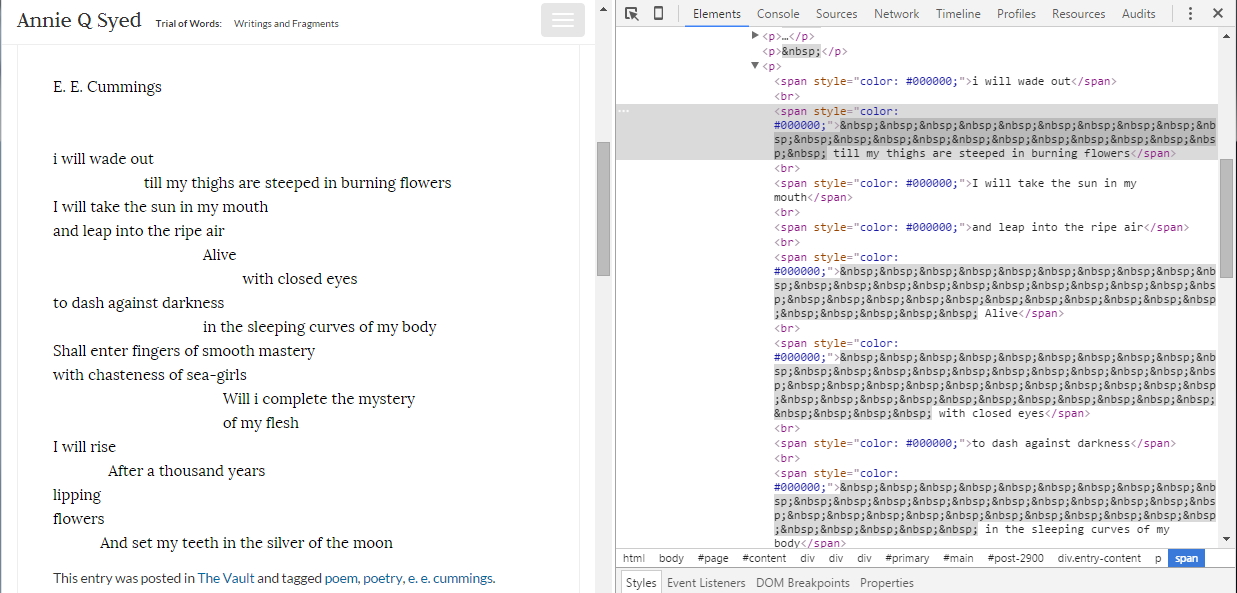
Take a look at this poem by E. E. Cummings and on the right hand side you can see the clever way blogger Annie Q. Syed does an end-run around the content editor, using HTML no-breaking spaces:
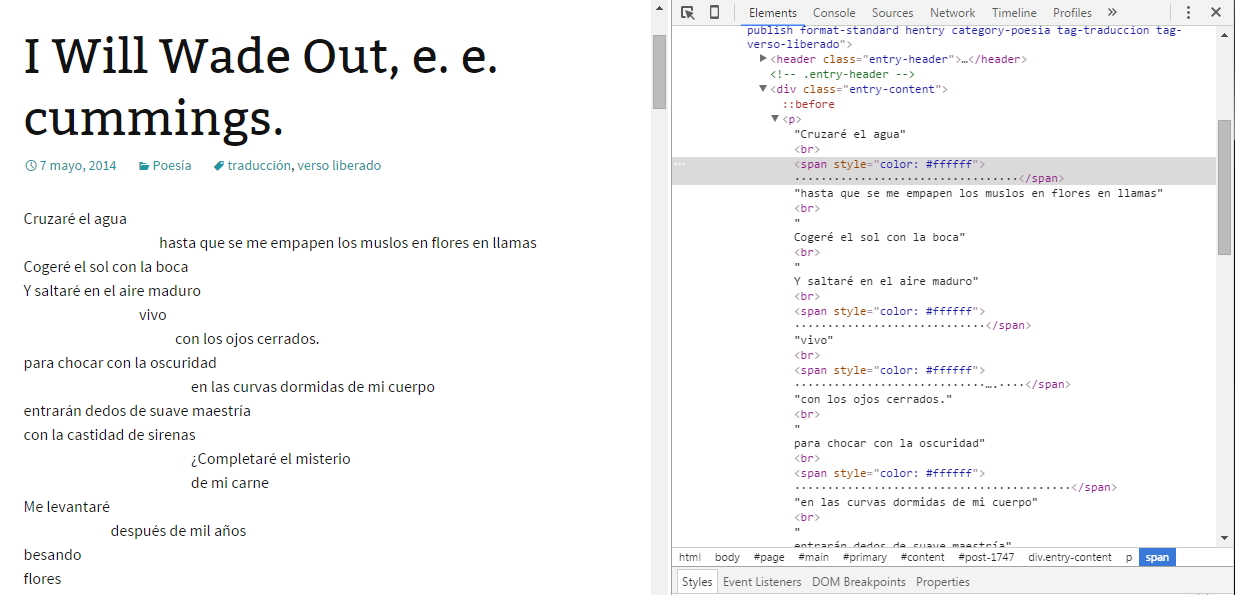
Or Eugenia Andino‘s use of multiple periods, coloured the same as the background, to create extra spaces:
Thankfully, if spacing is the only concern, there’s an easier answer to this dilemma: using Preformatted text.
Pre-Formatted Text for Poems
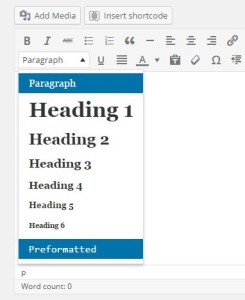 Found on the format dropdown of the WordPress content editor, this special text format operates outside some of the normal parameters of HTML. In particular, preformatted text allows for multiple spaces between characters.
In other words, if you press the space bar 8 times, you will get 8 spaces and the WordPress content editor won’t wipe them out when you save the post or page.
Here’s an example of the E.E. Cummings poem using preformatted text. On the left you see what the published version looks like and on the right you can see the HTML:

How to Work With the PRE Tag
Depending on where you’re at with entering your poem, here’s how to work with the PRE tag.
Nothing Has Been Entered Yet
In visual mode of the content editor, enter the first few words of the poem.
While your cursor is on that line, choose Preformatted from the dropdown menu on the second row of the content editor button bar (you’ll have to reveal that row if it’s not already showing).
Your text should change font, indicating you’re in preformatted mode. (don’t worry about the font; I’ll come to that later).
Now continue writing the poem and using any spacing of lines, words, and letters that you want, simply using your space-bar.
The Poem Has Already Been Entered
Option 1 – In visual mode, highlight all the poem’s text and then select Preformatted.
Keep in mind that this method will put individual PRE tags around each line or set of lines that have an Enter/Return. WordPress sees everything separate by Enter/Return as a paragraph, even if it’s just one word or one line.
Option 2 – In text/html mode, place an opening
<pre>
tag before the first word of the poem and then, after the last word of the poem, put a closing
</pre>
tag. This will look like my example above.
In either of these cases, you can now add spacing to your lines, words, and letters without losing it when you save the page.
But the Font’s So Ugly…
Yes, my font is quite different from the other two versions. That’s because the PRE tag displays in a fixed-width font by default (typically Courier), and most WordPress themes, if they deliberately style the tag, will keep that look. The reason is that preformatted text is most often used to display code or mathematical/scientific formulae.
If you want your poetry to look like it’s been done on a typewriter, this is perfect, but most of you will either want to match the site font or have a different one that looks nice. In fact, that’s often why people don’t use the PRE tag, because they think they’re stuck with the styling they get from their browser or WordPress theme.
How to Take Control of PRE Styling
However, we can control the styling of the PRE tag by using CSS (Cascading Stylesheets). While that may sound intimidating, thankfully, for what we want to achieve with poetry it’s pretty straightforward, and I’ll provide you with cut and past examples as we go along..
Adding a Custom Stylesheet
Self-Hosted WordPress: If you’re going to add custom CSS you’ll need a place to put it that’s separate from your theme’s CSS. For that you’ll want a custom CSS plugin and the one I recommend is My Custom CSS. Read this SHS article – How to Add Custom CSS to WordPress – to find out how to install this plugin, as well as alternatives, and why you want a plugin rather than using the custom CSS that comes with some themes.
WordPress.com: To add your own CSS, you’ll need a paid Premium or Business plan. With those you get a CSS editor which is independent of your theme.
Changing Formatting on All Your Poems
Assuming you enclose all your poems with the PRE tag, what I’m about to show you will change the formatting on every one of them.
For the purposes of this tutorial I’m showing you the CSS changes using the brower’s developer tools to make it easier to see what’s happening, but the styling rules should be placed in the custom CSS plugin mentioned in step 1. At the end I’ll show you how all the rules should look in that plugin.
Changing the Font
By targeting the PRE tag with the font-family property, I can control the font used to display the content within the PRE tag – in this case, the Georgia font (the “serif” is there in case the browser doesn’t have Georgia – but virtually all do).
pre { font-family: Georgia, serif; }
Here’s what the poem looks like after changing the font:
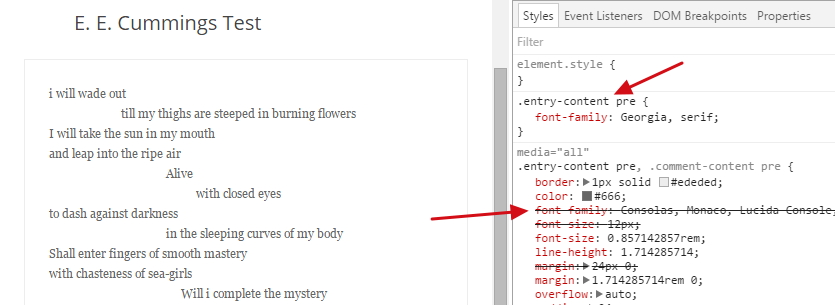
I’m sure you’ve noticed that my CSS rule has .entry-content before the PRE. That’s because my theme already has a rule governing any PRE tag that’s inside any element with the class ENTRY-CONTENT (which really means, any Post or Page content), so I have to qualify my selector by adding .entry-content before the PRE.
In other words, in order to override the theme’s rule, I needed to match the selectors in exactly the same order the theme was using them (see the selectors just above the bottom red arrow). Your theme might do something similar, using a class name from the content area, in which case, you’ll need to match those selectors in your rule.
Changing the Font Size
Now that you have the font under control, perhaps you also want the font size to stand out. Again, all you need is a CSS rule to govern that. Here I’ve increased the font size for all poems using the PRE tag:
pre { font-size: 1.2rem; }
Because I already have a rule governing the PRE tag, I can simply add the property “font-size” and its value “1.2rem” to the existing rule:
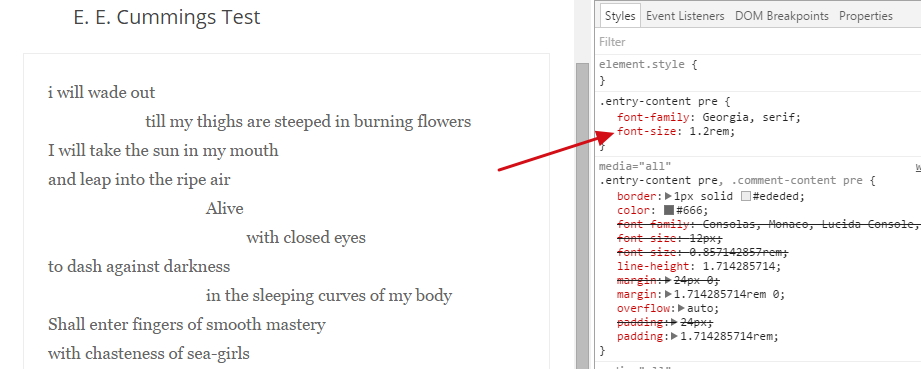
The crossed out lines over on the right indicate CSS declarations (property name/value pairs) which have been overridden by another CSS rule.
Changing the Line Spacing
In addition to a nice looking font, you may want all your poems to have spacing between lines that’s different from the rest of the text on the site. In terms of CSS, this is a property known as line-height.
pre { line-height: 1.2rem; }
Here’s the poem with a taller line height – again, I just add on to the existing rule:
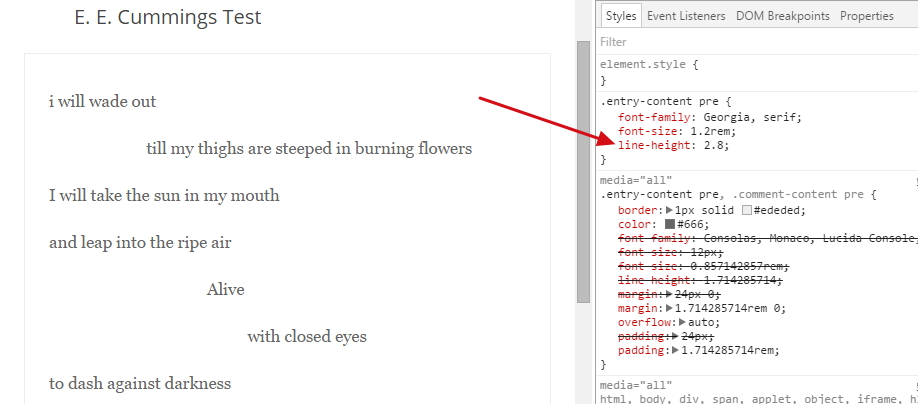
As I said, all of the changes we’ve made so far will affect any text using the PRE tag. But what if there’s text formatting you only want to apply to individual poems or to parts of individual poems?
Changing the Formatting of Parts of Poems
In addition to the spacing between lines of text, CSS also makes it possible to control the spacing between individual words (word-spacing) and even individual letters (letter-spacing). Now, it’s possible you’d want to change one or both of them for all your poems and you could certainly do that by adding the properties to your CSS rule governing all PRE tags.
But I’d like to use these two properties to illustrate how you can control formatting for single lines of poems or even single words. There are two approaches you could take:
- Create a class to which you apply a rule with one or more declarations (such as font-size: 1.2rem)
- Apply declarations directly in the HTML (what’s called in-line styling)
I’ll show you examples of both.
Using Classes to Target Parts of Poems
Suppose you were writing your own poems and you had a common way of emphasizing sections of text by making the space between each word larger. In other words, you knew you were likely going to use this formatting at least a few times over the course of several poems, and you want to ensure they always look alike.
This is the time to create a CSS class.
We’ll call this class “wide-words” and in order to apply it to some text we need to enclose that text in the HTML span tag, and that means going into WordPress’s text mode. The words you want to affect must be enclosed in the following way:
<span class="wide-words">the text to be formatted</span>
Then we need to create a CSS rule in our custom CSS plugin which tells the browser how to format the text – in this case the spacing between the words:
.wide-words { word-spacing: .08rem; }
And here’s what it looks like when applied (again, I’m showing you this in the developer tools of the browser, but the rule goes in your custom CSS plugin) – at the top right is the HTML, below that the CSS rule, and on the left you can see the effect on the words in that line.
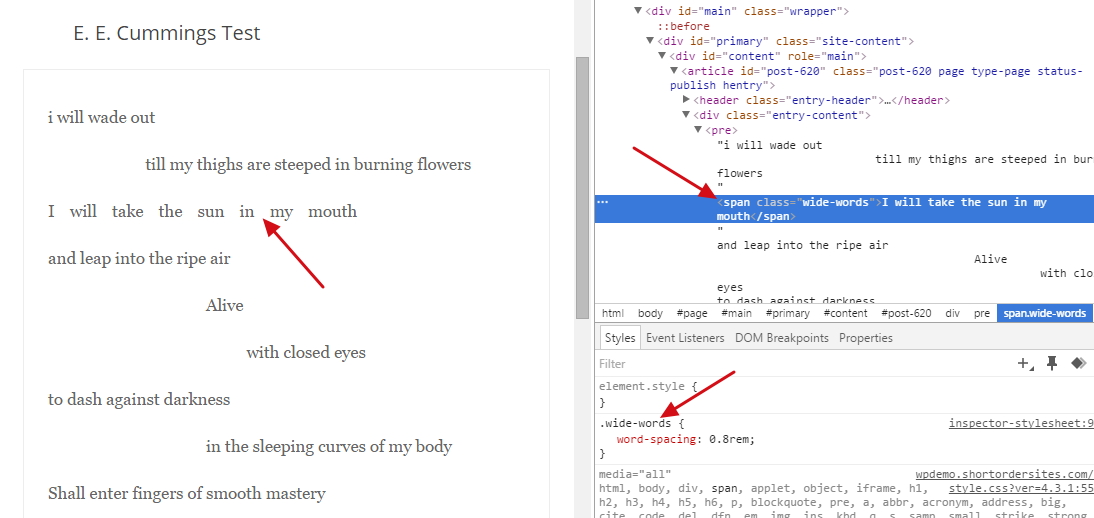
The HTML span tag is used for a particular reason: it does not create any top or bottom margins the way a paragraph tag would. In terms of CSS that’s because a span is an in-line element, while a paragraph is a block element. A block element would break up the poem in odd ways.
Now you could do the same thing with any of the rules we’re talking about in this article. In other words, you could create a class called, say, “taller-lines” and then, instead of adding line-height to all poems via the PRE tag, you would make a rule for “taller-lines” and either add the class to a particular poem:
<pre class="taller-lines">
or to a portion of a particular poem:
<span class="taller-lines">
Another example would be indenting of lines. If you had a common indent you’d like to apply to particular lines, you could create a class and then apply it like this:
.special-indent-30 { padding-left: 30px; }
<span class="special-indent-30">a line you want indented 30 pixels</span>
That will save you having to hit the spacebar a lot of times to indent the line and, more importantly, having to replicate the same spacing on other lines. Notice I named the class in such a way that I know quickly how big an indent this class will create.
Again, the same rule will apply to every instance where you use that class. But what about situations where you only need the rule to apply once?
Using In-Line Styling for Individual Cases
If you’re only targeting one poem or one section of a poem, then creating a class isn’t necessary. You’re not planning on using this exact formatting in other situations. For example, you might have a general font size for all PRE tags, but for a particular poem you want an even larger font size. In that case you could add an in-line style.
An inline style will override any other rule, whether in your theme or your custom css plugin.
The concept of an inline style is that you’re putting your rule(s) right inside the HTML tag, like this letter-spacing rule:
<span style="letter-spacing: 0.4em;">

The syntax for inline styling is simple: add a style=” ” attribute to your tag and then between the quote marks put one more more declarations (property name: property value;). It’s very important that each name/value pair is separated by the colon, and that each declaration ends with a semi-colon.
Using the span tag allows you to get specific right down to the letter level, while inline styling allows you to get very specific even when there’s a more general style rule governing the text within the span.
If you’re going to use a style over and over again, and want the simplicity of a single rule governing them all (handy if you ever change your mind or change your theme/design), then use a class and NOT inline-styling.
Putting It All Together
So let me put some of this coding together for you and from there you can copy it, changing property values or removing certain rules, etc. All of these belong in your custom CSS plugin. You can use the property name/value pairs if you’re creating some inline styling.
pre {
     font-family: Georgia, serif;
     font-size: 1.2rem;
     line-height: 1.2;
}
.wide-words {
     word-spacing: 0.4rem;
}
.wide-letters {
     letter-spacing: 0.2rem;
}
You can mix and match these, of course. If you want all poems to have a certain word spacing, put that rule in the PRE rule-set or if you want the font-family to apply only to certain poems, create a new class with that rule, and then name individual PRE tags with
class="my-poem-font"
I’d love to see some links to formatting you’ve done on your site – just tell me in the comments below. Or if you have other suggestions for formatting, I’d love to hear about those too.
Enjoy!
What's Your Take?